How to Correct a Faulty Ridge Vent on Your Roof
A bad ridge vent installation can cause a very real roof leak, even on a fairly new house. I recently ran into this exact problem on a home in Zebulon, and it is a good example of how a small installation mistake can turn into significant interior water damage.
The issue was not the entire roof. It was one section of ridge vent that had not been fastened down properly. That small gap was enough to let wind-driven snow blow underneath the vent, drop through the ridge opening, and leak into the home.
This is why proper nail placement matters so much on a shingle-over ridge vent system. If the vent is not secured where the manufacturer intends, it may not sit tight to the roof, and once that happens, water intrusion becomes a real possibility. 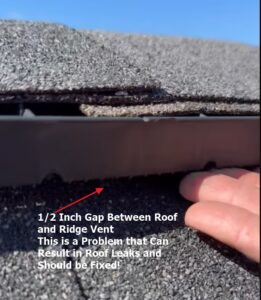
What went wrong with this ridge vent
About a month earlier, the area had snow and ice along with unusually strong wind. Normally, snow on a roof does not always create a problem by itself. But when snow is combined with wind in the 30 to 35 mph range, it can get pushed into places it should never reach.
On this roof, one stretch of ridge vent had about a half-inch gap along the span. Because that section was not seated all the way down, the wind was able to blow snow up under the vent. From there, it fell through the ridge opening and into the attic space, which led to leaking inside the home.
The rest of the roof was fine. The other ridge vent sections were seated properly, and there were no leaks elsewhere in the house. That made the problem easier to isolate.
Why improper nail placement causes ridge vent failure
Once the ridge cap shingles were removed, the cause was exactly what I expected: the nails securing the ridge vent were not installed in the manufacturer’s designated fastening area.
Instead of being placed in the proper location, the nails were driven near the edge of the vent. That matters because ridge vent products are designed with reinforced fastening zones. In this case, the vent has a cylindrical structural area that is intended to support the fastener and help the vent stay properly seated.
When installers ignore that fastening zone and just put the nails wherever they want, several things can happen:
- The vent may not sit flush against the shingles.
- It becomes harder to control nail depth, which increases the chance of underdriving or overdriving the fastener.
- The vent can become depressed or distorted over time.
- The fastener can eventually pull through, allowing the vent to lift and create gaps.
Once a ridge vent loses that clean, flat contact with the roof surface, it is much more vulnerable during severe weather.
Why homeowners often do not catch this problem
This is one of those roofing details that many homeowners are never told to look at. Even some home inspections will not catch it, especially if the ridge cap shingles are still in place and the defect is not obvious from the ground.
Unfortunately, this kind of thing also shows up in newer homes more often than it should. The house in this case was only six years old. That is a reminder that new construction does not automatically mean high-quality roof installation.
Small details in roofing matter. A vent can look finished from the street and still be installed incorrectly underneath. 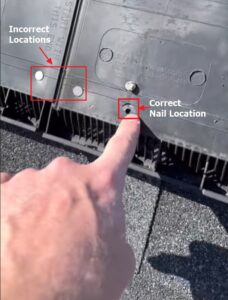
How to repair a faulty shingle-over ridge vent
The repair was straightforward, but it needed to be done correctly. The goal was not just to replace the damaged section, but to improve the waterproofing along the ridge so the home would be protected even if another severe snow and wind event occurred.
- Remove the ridge cap shingles
The first step was taking off the ridge cap shingles to expose the existing ridge vent and inspect the fastening pattern.
That confirmed the installation error right away. The nails were all in the wrong place, near the edge rather than in the recommended fastening zone.
- Remove the old ridge vent
After inspection, the faulty ridge vent was fully removed so the ridge line could be rebuilt properly.
At this stage, the roof was stripped back enough to prep the area for a better installation.
- Apply ice and water shield along the ridge
Before installing the new vent, I added a strip of ice and water shield over the ridge line. This was applied all the way down the top edge where the final courses of shingles meet.
After that, the ridge opening was cut back open so the vent could function correctly.
Ice and water shield is a thick, adhesive-backed membrane. When it warms up, it bonds tightly to the roof surface. One of its biggest benefits is how it seals around nail penetrations.
Any nail driven through it is surrounded by that sticky, almost spongy waterproof material, which helps protect the fastener shaft from water entry.
That extra layer of protection is valuable here for two reasons:
- It waterproofs the top edge of the roof beneath the ridge vent.
- It helps prevent leaks through fasteners if wind-driven moisture ever reaches that area again.
- Install the new ridge vent correctly
With the membrane in place, the new ridge vent was installed and fastened in the proper manufacturer-specified location.
This is the most important part of the whole repair. The vent needs to sit tight with no visible gap. The fasteners need to go where the product is designed to receive them, not just wherever it is convenient to shoot a nail.
When installed correctly, the reinforced fastening cylinder in the vent helps protect the nail from water intrusion while also maintaining the vent’s shape and seating.
- Reinstall the ridge cap shingles
Once the vent was secure, the ridge cap shingles were installed over the top to finish the repair.
The final section just needed sealant on the last termination shingle, and the ridge was wrapped up.
What a proper finished repair looks like
When the job was complete, the difference was easy to see. The new ridge vent sat tight to the roof with no open gap along the span. The ice and water shield was in place beneath the edges, and the entire assembly was sealed down correctly.
That means:
- No openings for snow to blow underneath
- Better protection at the ridge line fasteners
- A much lower chance of repeat leaking during future storms
There may be a slight visible transition where shorter pieces of membrane are overlapped, especially since these materials often come in fixed lengths, but that is minor compared to making sure the ridge is watertight and properly assembled.
Why this matters on asphalt shingle roofs
Shingle-over ridge vent systems are common on asphalt shingle roofs because they provide attic ventilation while blending into the roofline. But they only work well when they are installed to manufacturer specifications.
A ridge vent is not something that should just be laid in place and nailed at random. Proper fastening, proper seating, and proper weatherproofing all matter.
If one of those steps is skipped, the vent can become a weak point on an otherwise sound roof.
Signs you may have a ridge vent leak
If you suspect a roof leak and are not sure where it is coming from, a faulty ridge vent is one possibility worth checking, especially after snow, ice, or wind-driven rain.
Some common warning signs include:
- Water spots on ceilings near the upper part of the home
- Leaks that appear after storms with strong wind
- Moisture in the attic near the ridge line
- A visible gap or lifted section at the ridge vent
Even if the problem looks minor from outside, the leak inside can become significant quickly.
The bigger lesson: roofing details matter
This repair is a perfect example of how a small installation detail can have a big impact. A half-inch gap at the ridge vent and improper nail placement were enough to create interior leaking on a six-year-old home.
That is why roof inspections and roof installation quality matter so much. Ridge vents, ridge cap shingles, ring shank nails, and waterproofing layers all have to work together. If one part is done wrong, the whole system is compromised.
When a ridge vent is installed properly, seated tightly, and backed up with ice and water shield at vulnerable points, it should perform well for years to come.
If you have roof leaks, suspect storm-related water intrusion, or just are not sure why a ceiling stain has appeared, it is worth having the ridge line and ventilation details checked carefully. Sometimes the problem is not the whole roof. Sometimes it is one overlooked detail right at the peak.
📞 Call us at (919) 241-7663 or visit properformanceroofing.com to schedule your free roof inspection today!